Arduino Uno with Ethernet Shield
In this tutorial, we will explore how to use an Arduino board along with the Ethernet shield to send sensor data from a DHT sensor to the IIOT Platform. The DHT22 can measure temperatures from -40°C to +125°C with an accuracy of 0.5°C and relative humidity from 0 to 100% with an accuracy of 2–5%. Here is a picture of the DHT22 sensor, Ethernet shield, and Arduino UNO.


Fig 1: DHT22, Ethernet Shield and Arduino UNO
Step 1:
Hardware Setup
First, you need to connect the Ethernet shield to the Arduino UNO board, and then connect the DHT sensor to your board by following the appropriate pin connections. Connections are relatively simple. Begin by connecting the + (VCC) pin to the Arduino’s 5V output and the – (GND) pin to ground. Finally, connect the Out pin to digital pin #5.
Step 2:
Retrieve MQTT Credentials
Go to the project tab. From there, you can copy your MQTT username and token inside the setting section and your MQTT topic inside the assets section that is needed in the program.

Fig 2: Settings Section
Step 3:
Connect Ethernet Shield to Internet
Connect the Ethernet shield with the Internet: You need to connect the Ethernet shield to your router or your computer via an Ethernet cable (RJ45 cable). If you want to connect the Ethernet shield to your router, then go HERE.
The first step is to enable sharing on your existing internet. In my case, the laptop is connected to the router over Wi-Fi. Open Control Panel, then Network & Internet, then Network & Sharing Center. Click on the existing internet connection.
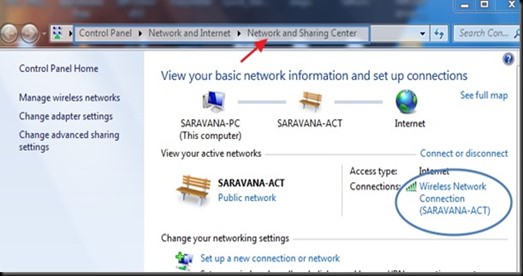
Fig 3: Windows Network and Sharing Center
On the next screen, click PROPERTIES and then SHARING.

Fig 4: Wireless Network Connection Properties
Tick the box to enable Internet connection sharing.
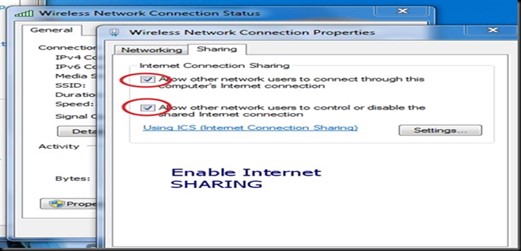
Fig 5: Internet Connection Sharing
Now plug in the USB cable to the Arduino, and then connect the RJ45 straight cable from the shield to the RJ45 port of the laptop.
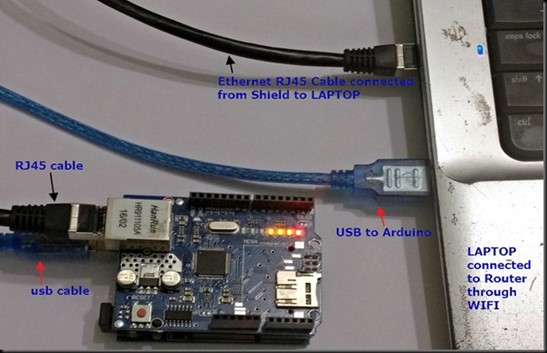
Fig 6: Hardware Setup
As soon as you connect the RJ45 cable, you can see an unidentified network.
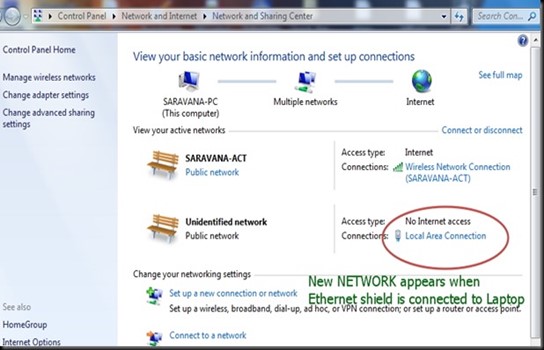
Fig 7: Windows Network and Sharing Center
Click on that new network and select properties. On the next screen, double-click on Internet Protocol Version 4 (TCP/IPV4).

Fig 8: Local Area Connection Properties
You can see an IP address like 192.168.137.1. Note that this is the new gateway IP of the new network formed by the Ethernet shield. If you do not see any IP, just select “Use the following IP” and manually enter the IP.
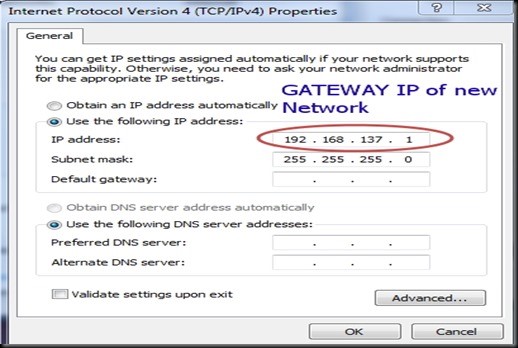
Fig 9: IPV4 Properties
Now run RUN > CMD > IPCONFIG /ALL to verify the IP. Under the Ethernet adapter, the gateway IP of the new network is displayed. Note that this is the gateway IP, and the Ethernet shield will be allotted IP in this range.
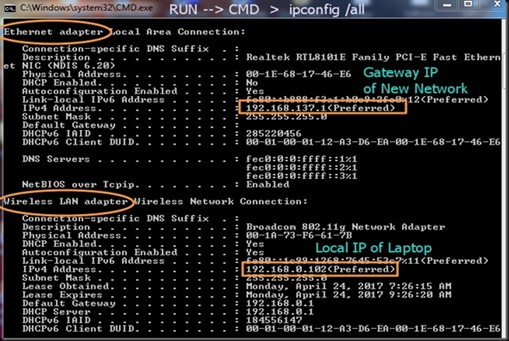
Fig 10: Windows CMD
Now, we can use this Ethernet shield to send the sensor data to the IIOT platform or the server.
Step 4:
Library Installation
Library Installation:Install the Ethernet, PubSubClient and DHT sensor library on your Arduino IDE. This library will enable us to connect to the IIOT Platform and publish the sensor data. Go to Sketch > Include Library > Manage Libraries and search for the library name in the library manager and install the library.
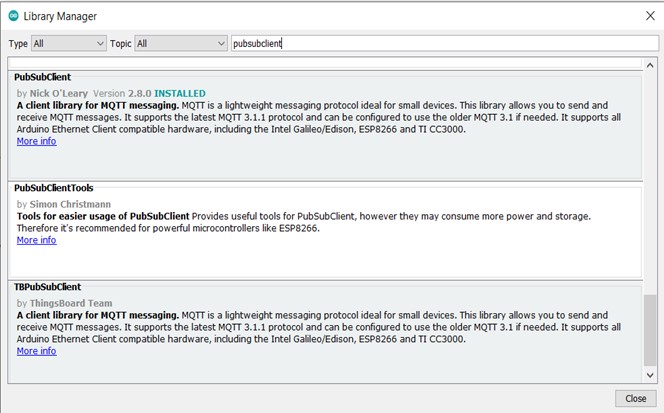
Fig 11: Arduino Library Manger
Step 5:
Setting Up the Code
Setting up the code Now, the code will be divided into different sections:
Including the necessary libraries and defining constants: We include the required libraries, such as Ethernet, PubSubClient, and DHT. Additionally, we define constants like MQTT server details, the Ethernet Mac ID, and DHT sensor details.
Connecting to the MQTT server: We connect to the IIOT Platform, set up the client, and define the objects. We also put in the MQTT username and password.
Reading the DHT sensor data: We define a function called readDHTSensor() that reads the temperature and humidity values from the DHT sensor. If the readings are successful, we proceed to publish the data using the function publishSensorData().
Publishing sensor data to the IIOT Platform: We format the temperature and humidity data into a JSON payload and publish it to the IIOT Platform.
Program
#include <SPI.h>
#include <Ethernet.h>
#include <PubSubClient.h>
#include <DHT.h>

#define DHT_PIN 5
#define DHT_TYPE DHT22
DHT dht(DHT_PIN, DHT_TYPE);
byte mac[]    = {0xD4, 0xA8, 0xE2, 0xFE, 0xA0, 0xA1};
char server[] = "www.iiotif.com";
void callback(char* topic, byte* payload, unsigned int length) {
  }
EthernetClient ethClient;
PubSubClient client(server, 1883, callback, ethClient);
void setup()
{
  Ethernet.begin(mac);
  Serial.begin(9600);
  dht.begin();
  client.setServer(server, 1883);
  client.setCallback(callback);
  while (!client.connected()) {
    Serial.print("Connecting to MQTT server...");
    if(client.connect("arduinoClient","ethernetshield_1685692281114", "cICJJrLVia6YYwnbjcCQi6nhIyqi_ayT")) {
      Serial.println("connected");
    } else {
      Serial.print("failed, rc=");
      Serial.print(client.state());
      Serial.println(" retrying in 5 seconds");
      delay(5000);
    }
  }
}

void readDHTSensor() {
  float temperature = dht.readTemperature();
  float humidity = dht.readHumidity();
  if (isnan(humidity) || isnan(temperature)) {
    Serial.println("Failed to read from DHT sensor!");
    return;
    }
  Serial.print("Humidity: ");
  Serial.print(humidity);
  Serial.print("% Temperature: ");
  Serial.print(temperature);
  Serial.println("°C");
  publishSensorData(temperature, humidity);
}
void loop()
{
  client.loop();
  readDHTSensor();
  delay(5000);
}
void publishSensorData(float temperature, float humidity) {
  char temperatureStr[6];
  char humidityStr[6];
  dtostrf(temperature, 4, 2, temperatureStr);
  dtostrf(humidity, 4, 2, humidityStr);
  char payload[50];
  snprintf(payload, sizeof(payload), "{"temperature":%s,"humidity":%s}", temperatureStr,     humidityStr);
  client.publish("a/weather condition_1685692307330", payload);
}
Step 6:
Monitor MQTT Connection and Sensor Data
After uploading the code to the Arduino board, open the serial monitor to observe the connection process. You should see messages indicating the MQTT server connection status. If everything goes smoothly, the DHT sensor data will be published to the specified MQTT topic.
Step 7:
Monitor Data on IIOT Platform
Allow the program to run for a while so that you can view some useful data on the website. A sample set of readings stored on the website is shown below in graphical format:
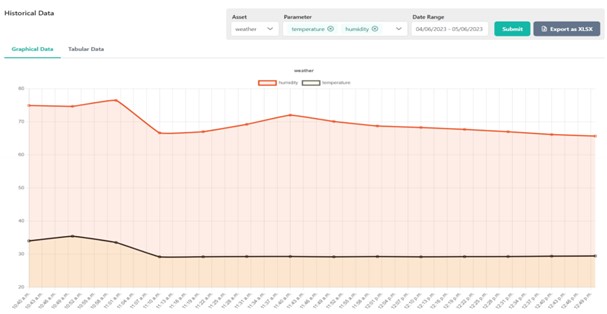
Fig 12: Graphical Data Representation
Conclusion
In this tutorial, we explored the process of sending DHT sensor data to the IIOT Platform using an Arduino board, an Ethernet shield, and the PubSubClient library.